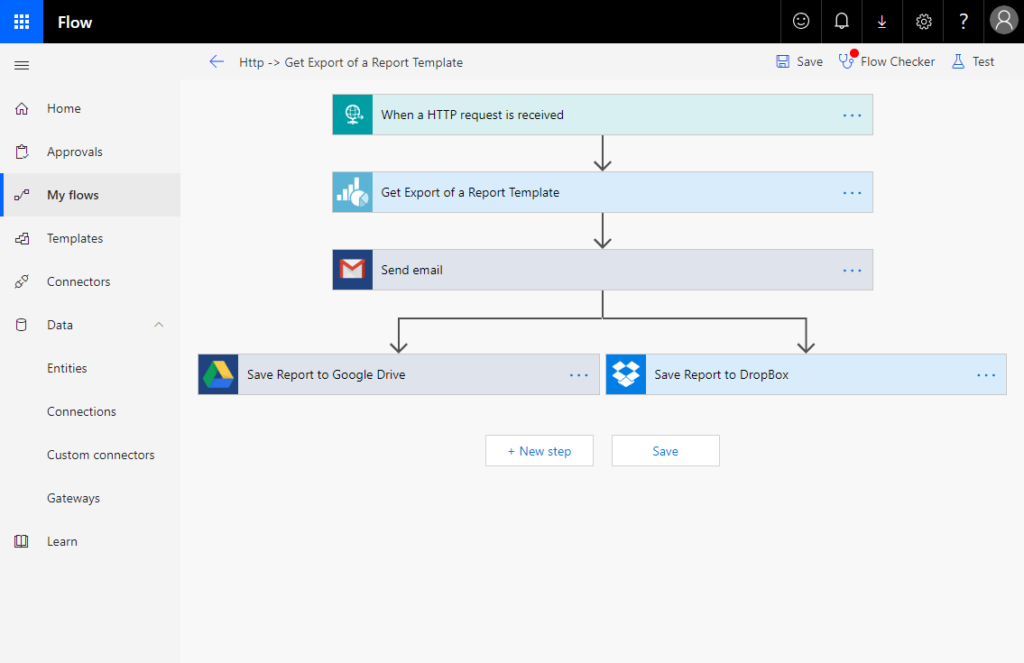
Figure 1: Example of a workflow that sends a previously exported report by email after an HTTP request and then saves it in the cloud.
What you need to do:
- You need at least version 24 of the combit Report Server.
- Activate the REST API of your report server (Administration > Advanced Settings > Activate REST API)
- Create a user of type “API account with token” in the Report Server.
- Create your own custom connector with Micosoft Flow
- Install a local data gateway (On-premises data gateway) if the Report Server is running on your intranet.
Setting up Your Local Data Gateway (Required if The Report Server is NOT Accessible on the Internet)
The local data gateway acts as a bridge by providing fast and secure data transfer between local data (data outside the cloud) and the Power BI, Microsoft Flow, Logic Apps, and PowerApps services.
Using the REST API of the combit Report Server, you can now connect the Report Server from Microsoft Flow to your own network.
A custom connector for the data gateway (also called service on other platforms) connects to the REST API of the report server.
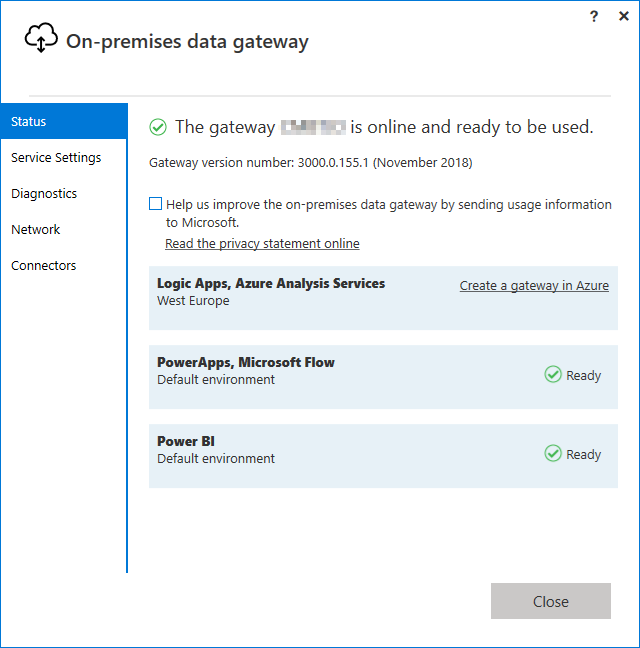
Figure 2: Running the local data gateway.
Creating Your Own Connector
If you run a Report Server that is also available on the internet (e.g. https://myserver.com/combitReportServer) you have to create your own custom connector and don’t need the local data gateway.
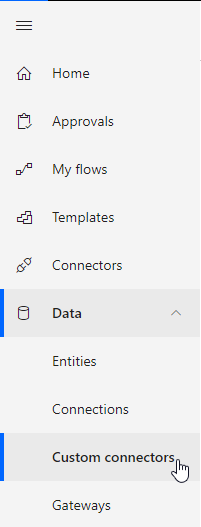
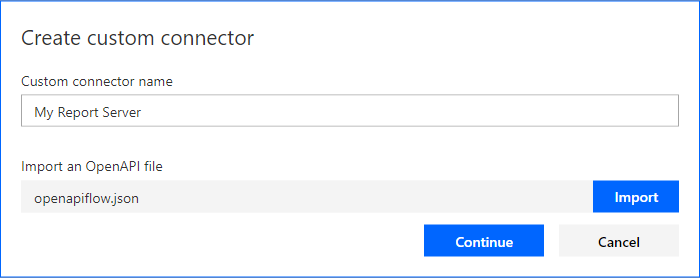
1. On the Microsoft Flow page under Data click on Custom Connector.
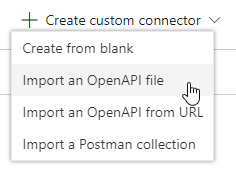
2. Click on the button + Create custom connector, then Import to OpenAPI file
3. Download the file openapiflow.json. This includes the definition of some API functions of the Report Server REST API.
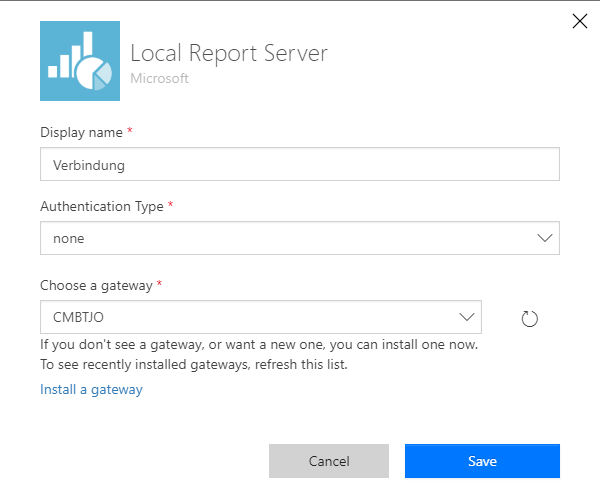
5. Define icon and color. Enter the address of the Report Server and, if the address (e.g. https://localhost/rs24) is only available in the intranet (i.e. not from outside), check the box Connect via on-premises data gateway.
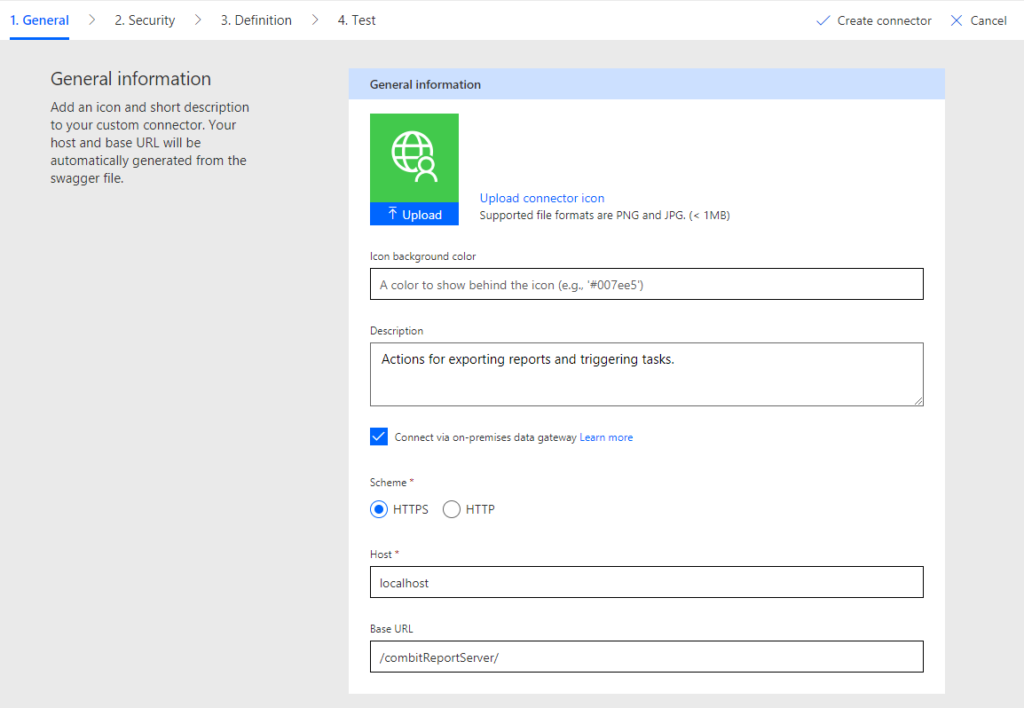
6. With “Create connector” the connector is now created.
The Security, Definition and Test tabs are no longer relevant and you can create your own flow directly.
Since the authentication is done individually for each action, the Custom Connector itself has no authentication type in Microsoft Flow (set Authentication Type to none).
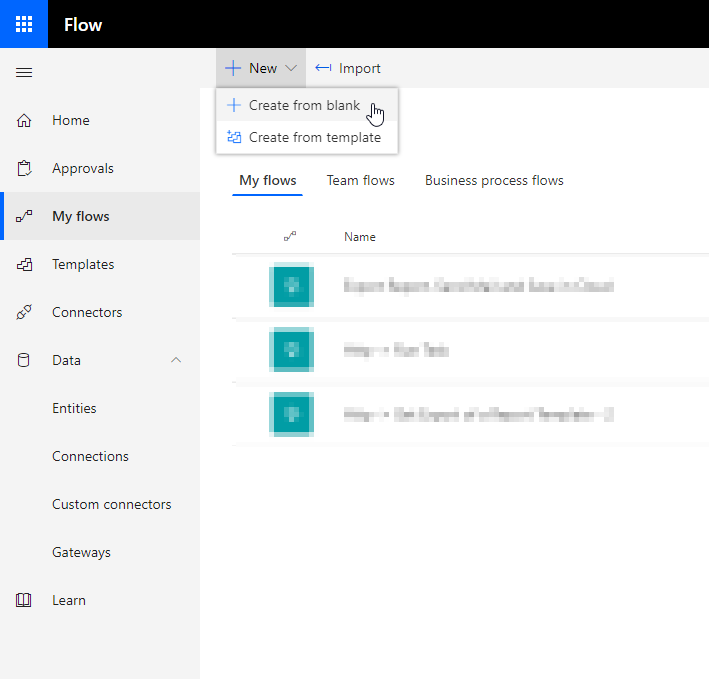
Creating Your Own Flow
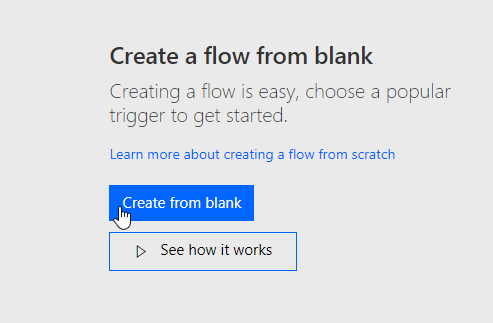
1. Click “Create from blank”
2. Click “Create from blank” again
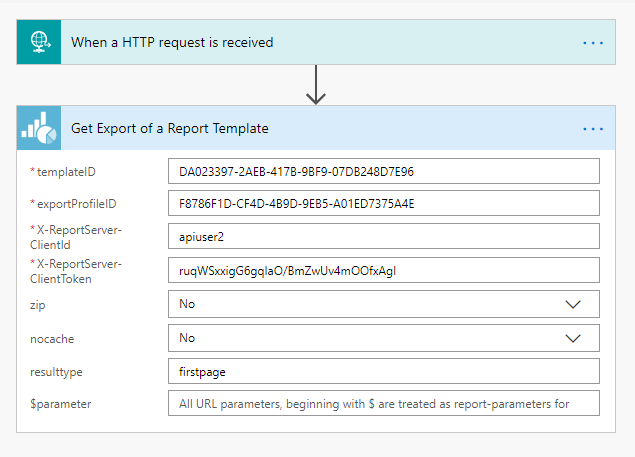
3. Add any trigger (trigger of the workflow) (here e.g. When a HTTP request is received)
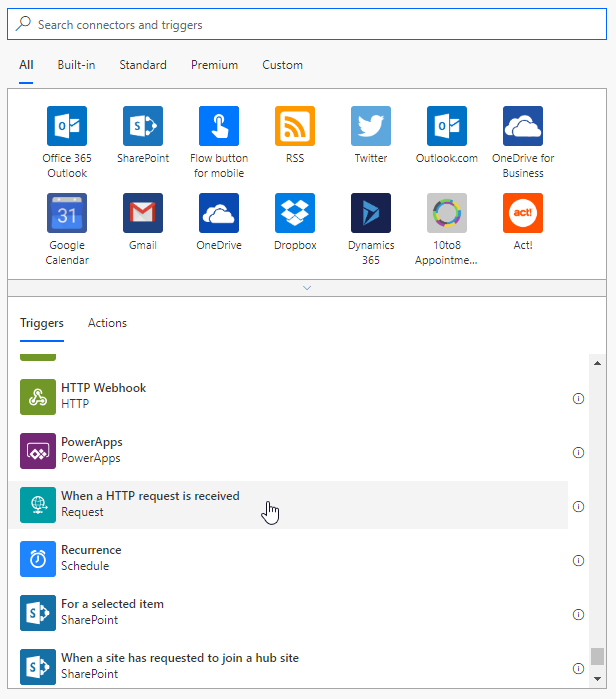
4. Click “+ New step”

5. Go to the Custom tab and select the connector you created before.
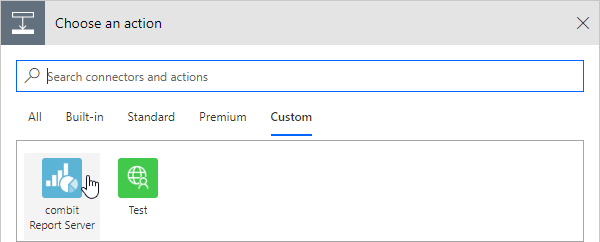
6. Select the “Get Export of a Report Template” action.
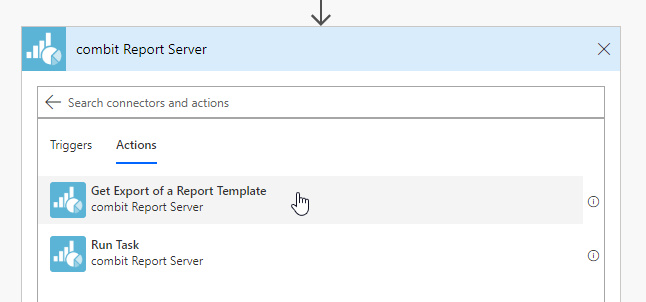
7. Only required for a connection with a local data gateway
8. Fill in all required fields (see notes for information on IDs)
9. Press Save and, if necessary, Test.

Example Workflow 1: Export a Report Template and Then Save it to Google Drive / Dropbox:
The Report Server could also save the report directly itself. However, since the storage of a report is a very common requirement, we have implemented this in this workflow as an example using Microsoft Flow. Adding any trigger (here HTTP Request)
1. Adding the Get Export of a Report Template action
2. Connect to your gateway
3. Specifying IDs for the Export
4. Unique IDs are used here. You can copy these IDs (e.g. A0BCB71A-BA65-45C597F3-1282D9C7C126) from the URL, which is always at the end of the address:
- For the ExportProfileID open the export profile for editing http://www.report-server.com/combitReportServer/ExportConfig/Edit/A0BCB71A-BA65-45C5-97F3-1282D9C7C126
- For the TemplateID open the report template for editing http://www.report-server.com/combitReportServer/Template/Edit/DA023397-2AEB-417B-9BF9-07DB248D7E96
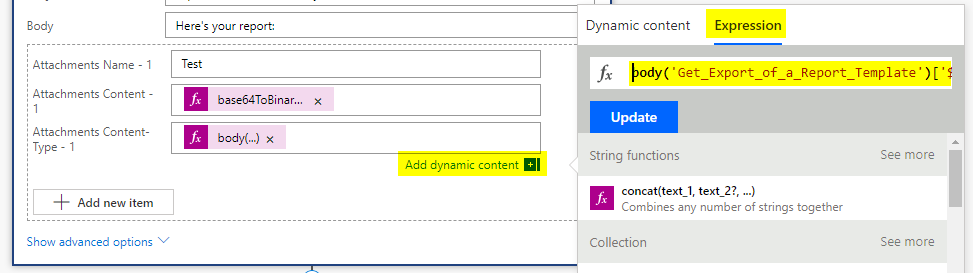
5. For file providers:
- File content => Add dynamic content
- Expression Tab
- Insert the following expression: base64ToBinary(body(‘Get_Export_of_a_Report_Template’)[‘$content’])
Important: Please do not simply enter the expressions in the field itself, but in the Expression / Expression tab on the right.
6. Execute trigger => Test!
Example Workflow 2: Sending the Report by Email
Perform steps 1-5 of Example workflow 1.
Then “+ New Step”:
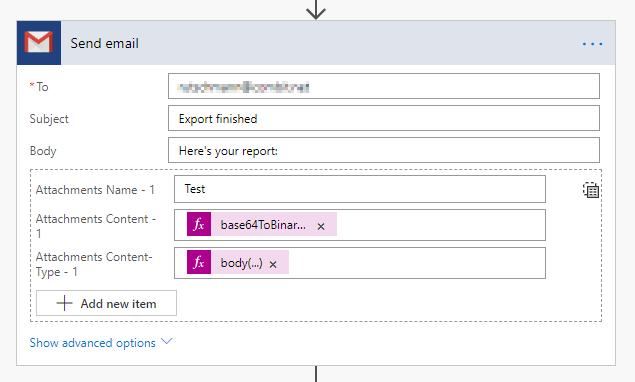
Attachments Content (expression): base64ToBinary(body(‘Get_Export_of_a_Report_Template’)[‘$content’])
Attachments Content Type (expression): body(‘Get_Export_of_a_Report_Template’)[‘$content-type’]
As soon as the export profile is changed, the content type and the file extension also change.
Example Workflow 3: Executing a Planned Report
For this you only need the ID of the planned report and the access data of the API user.
Note: For the TaskID, open the Scheduled Report to edit http://www.report-server.com/combitReportServer/Task/Edit/AC039DF1-EFB6-4181-A002-171463480E0F
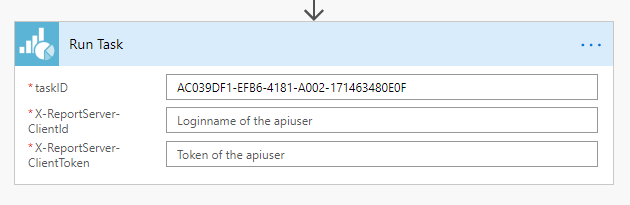
The planned reports and their actions can then be defined in the Report Server. When Microsoft Flow executes a scheduled report, it does not receive the export of the report itself.
Hints
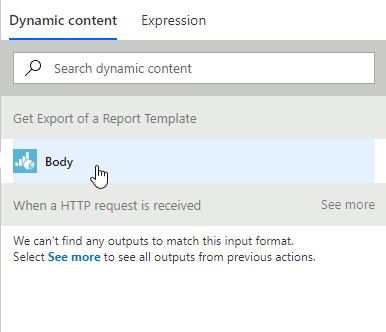
- Instead of body(‘Get_Export_of_a_Report_Template’) it’s best to use the premade button, because the action may not be called ‘Get_Export_of_a_Report_Template’:
Explanations
- IDs
When exporting a report template via REST API, the finished report (PDF, DOCX, etc.) is encoded with Base64 and returned by the REST API as follows:
Unique IDs are used in the article. You can copy these IDs (e.g. A0BCB71A-BA65-45C597F3-1282D9C7C126) from the URL, which is always at the end of the address:
For the TaskID open the scheduled reports for editing http://www.report-server.com/combitReportServer/Task/Edit/AC039DF1-EFB6-4181-A002-171463480E0F
For the ExportProfileID, open the export profile for editing http://www.report-server.com/combitReportServer/ExportConfig/Edit/A0BCB71A-BA65-45C5-97F3-1282D9C7C126
For the TemplateID open the report template for editing http://www.report-server.com/combitReportServer/Template/Edit/DA023397-2AEB-417B-9BF9-07DB248D7E96
Expression: base64ToBinary(body(‘Get_Export_of_a_Report_Template’)[‘$content’])
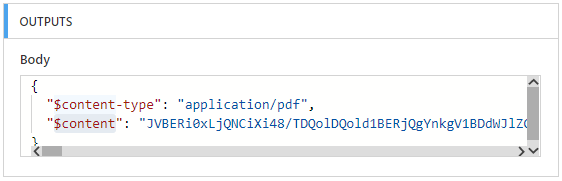
The printout converts the transferred file back from Base64, which is stored in the body of the Get_Export_of_a_Report_Template action as $content.
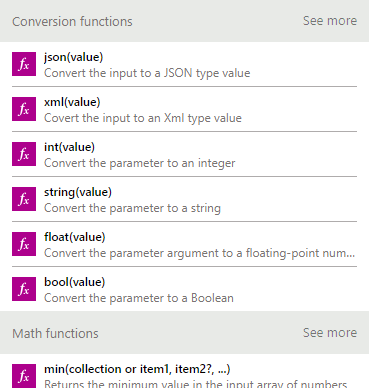
The ready-made functions base64ToBinary and body are provided by Microsoft Flow (there are many more to process data):
Conclusion
After configuring the Custom Connector and using these sample workflows, you can now integrate exporting or generating reports into your flows. Whether it is uploading to any cloud server or general report processing.
In the next version, the Report Server will also be able to trigger flows via WebHooks.

For over 20 years Alexander Horak is engaged in software development and has already worked at combit during his computer science studies. Nowadays, he is Head of Development of the combit Report Server, an ASP.NET MVC based Enterprise Reporting solution. In his spare time he loves soccer and is an active supporter of FC Bayern Munich.